Serverless computing represents a paradigm shift in application development, offering significant advantages in terms of scalability, cost-efficiency, and reduced operational overhead. This approach allows developers to focus on writing code without managing the underlying infrastructure. The AWS Serverless Application Model (SAM) CLI provides a powerful and streamlined way to build, test, and deploy serverless applications on AWS, simplifying the complexities of infrastructure provisioning and deployment workflows.
This document provides a comprehensive guide to deploying serverless applications using SAM CLI. It will walk through the entire process, from setting up your environment and initializing a new project to defining resources, writing function code, testing locally, building, deploying, monitoring, and even advanced deployment strategies. Each section is designed to provide practical insights and actionable steps, ensuring a clear understanding of the concepts and their implementation.
Introduction to Serverless Applications and SAM CLI
Serverless computing represents a paradigm shift in cloud architecture, offering a way to build and run applications without managing servers. This approach focuses on executing code in response to events, abstracting away the complexities of infrastructure management. AWS SAM CLI streamlines the development, testing, and deployment of these serverless applications.
Benefits of Serverless Architecture
Serverless architecture offers several advantages that contribute to its increasing adoption. These benefits primarily revolve around operational efficiency, scalability, and cost optimization.
- Reduced Operational Overhead: Serverless platforms handle server provisioning, scaling, and maintenance. Developers can focus solely on writing and deploying code, eliminating the need for tasks such as patching, operating system updates, and capacity planning. This reduction in operational burden allows development teams to be more agile and concentrate on core business logic.
- Automatic Scaling: Serverless applications automatically scale based on demand. The underlying infrastructure dynamically adjusts resources to accommodate fluctuating workloads, ensuring optimal performance and responsiveness without manual intervention. This inherent scalability is particularly beneficial for applications with unpredictable traffic patterns or seasonal demand.
- Cost Efficiency: Serverless models typically employ a pay-per-use pricing structure. You are only charged for the compute time consumed by your code, not for idle resources. This contrasts with traditional server-based models, where you pay for provisioned resources regardless of actual utilization. This pay-per-use model can significantly reduce costs, especially for applications with sporadic or low traffic. For example, an application processing a few thousand requests per day might cost significantly less than a comparable application running on a virtual machine that is always on.
- Increased Developer Productivity: The reduced operational overhead and automatic scaling capabilities free up developers to focus on application development and innovation. Serverless architectures often integrate with various development tools and services, further accelerating the development cycle and enabling faster time-to-market.
Overview of AWS SAM CLI and Its Purpose
AWS Serverless Application Model (SAM) Command Line Interface (CLI) is a tool designed to simplify the development, testing, and deployment of serverless applications built on AWS. It leverages the AWS SAM specification, which is an extension of AWS CloudFormation, providing a declarative way to define serverless resources.
- Simplified Development Workflow: SAM CLI provides commands for initializing, building, testing, and debugging serverless applications locally. This allows developers to iterate quickly and validate their code before deploying it to the cloud. For instance, `sam init` can generate a project structure with pre-configured templates, and `sam build` compiles and packages code for deployment.
- Local Testing and Debugging: SAM CLI allows you to simulate AWS Lambda functions and API Gateway locally. This enables developers to test their applications without deploying them to the cloud, significantly reducing development time and cost. The `sam local invoke` command can execute a Lambda function locally, and `sam local start-api` starts a local API Gateway to test API endpoints.
- Automated Deployment: SAM CLI streamlines the deployment process by automating the creation and management of AWS resources. It uses AWS CloudFormation to deploy the application, ensuring consistency and repeatability. The `sam deploy` command deploys the application to AWS, creating or updating the necessary resources based on the SAM template.
- Resource Management: SAM CLI handles the management of serverless resources, including Lambda functions, API Gateway endpoints, DynamoDB tables, and more. It simplifies the creation, configuration, and deletion of these resources, making it easier to manage the application’s infrastructure.
Core Components of a Serverless Application
A serverless application typically comprises several key components that work together to provide functionality. Understanding these components is essential for designing, building, and deploying serverless solutions.
- Lambda Functions: These are the core compute units of a serverless application. Lambda functions are small, event-driven pieces of code that execute in response to triggers such as API Gateway requests, database updates, or scheduled events. They are stateless and designed to perform a specific task.
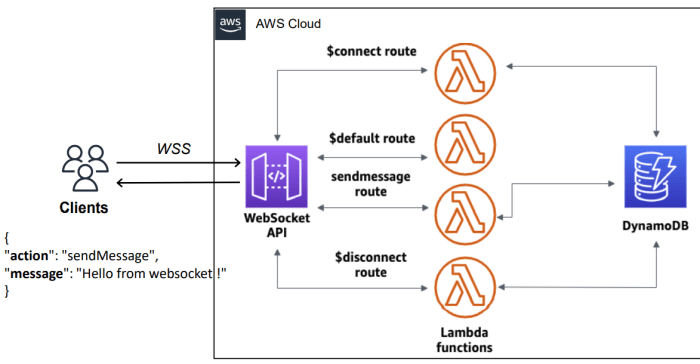
- API Gateway: This service acts as a front door for applications, handling API requests and routing them to the appropriate Lambda functions. It manages API endpoints, authentication, authorization, and traffic management. It also allows you to define and manage REST APIs, WebSocket APIs, and HTTP APIs.
- Event Sources: Event sources trigger the execution of Lambda functions. These can include various AWS services, such as Amazon S3, Amazon DynamoDB, Amazon Kinesis, and Amazon CloudWatch Events, or external services. They provide the input that Lambda functions process.
- Data Storage: Serverless applications often utilize data storage services such as Amazon DynamoDB, Amazon S3, or relational databases like Amazon RDS. These services provide persistent storage for application data. DynamoDB is a popular choice for serverless applications due to its scalability and pay-per-use pricing.
- IAM Roles and Policies: AWS Identity and Access Management (IAM) roles and policies define the permissions that Lambda functions and other resources have to access other AWS services. Proper IAM configuration is critical for security and ensuring that resources have the necessary access to perform their functions. For example, a Lambda function that reads from an S3 bucket would require an IAM role with permissions to access that bucket.
Prerequisites and Setup
 - DEV Community")
To successfully deploy a serverless application using the SAM CLI, a robust foundation is required. This involves setting up an appropriate AWS environment and configuring the necessary tools on your local machine. Proper configuration ensures that the SAM CLI can interact with your AWS account and deploy resources as defined in your serverless application’s configuration files.
AWS Account Setup and IAM Permissions
Setting up an AWS account and configuring the correct Identity and Access Management (IAM) permissions are crucial for deploying serverless applications. This involves creating an AWS account, setting up IAM users, and assigning them appropriate permissions.
- An active AWS account is the fundamental requirement. This provides the infrastructure to host and manage your serverless applications. You’ll need to have access to the AWS Management Console or use the AWS CLI.
- An IAM user with the necessary permissions is required. It is strongly recommended to avoid using the root account for everyday operations. Instead, create an IAM user with specific permissions. These permissions should be scoped down to only the necessary resources and actions to follow the principle of least privilege.
- The following IAM permissions are generally required for SAM CLI deployment:
- AWSLambdaFullAccess: Allows the creation, update, and deletion of Lambda functions.
- AmazonAPIGatewayAdministrator: Allows the creation, update, and deletion of API Gateway resources.
- AmazonS3FullAccess: Allows the creation, update, and deletion of S3 buckets and objects. This is often needed for storing deployment artifacts.
- AWSCloudFormationFullAccess: Allows the creation, update, and deletion of CloudFormation stacks. SAM CLI uses CloudFormation under the hood.
- IAMPassRole: Allows the user to pass IAM roles to other AWS services. This is often needed for Lambda functions to assume roles to access other AWS resources.
This is not an exhaustive list, and permissions may vary based on the specific resources used in your serverless application.
- It’s essential to create an IAM role for your Lambda functions. This role defines what resources your function can access. The role should have the necessary permissions to access the resources your function needs, such as S3 buckets, DynamoDB tables, or other AWS services. For example, a Lambda function that reads data from a DynamoDB table needs permissions to `dynamodb:GetItem` and `dynamodb:Scan` on that table.
- You can attach policies directly to your IAM user or create IAM roles and assign those roles to your Lambda functions. Using roles is generally preferred for security and maintainability.
SAM CLI Installation
The SAM CLI needs to be installed on your local machine to build, test, and deploy serverless applications. The installation process varies depending on the operating system.
- Windows:
- Using Chocolatey: Open a command prompt or PowerShell as an administrator and run `choco install aws-sam-cli`. Chocolatey is a package manager for Windows.
- Using MSI Installer: Download the latest SAM CLI MSI installer from the AWS website. Run the installer and follow the on-screen instructions. This typically involves specifying the installation directory and adding the SAM CLI to your system’s PATH environment variable.
- Verification: After installation, verify the installation by opening a command prompt or PowerShell and running `sam –version`. This should display the installed SAM CLI version.
- macOS:
- Using Homebrew: Open a terminal and run `brew tap aws/tap` and then `brew install aws-sam-cli`. Homebrew is a package manager for macOS.
- Using Python’s pip: If you have Python and pip installed, you can run `pip install aws-sam-cli`. It is recommended to use a virtual environment to manage the SAM CLI dependencies.
- Verification: After installation, verify the installation by opening a terminal and running `sam –version`.
- Linux:
- Using Python’s pip: Install SAM CLI using `pip install aws-sam-cli`. Consider using a virtual environment.
- Using package managers: For Debian/Ubuntu systems, you might use `sudo apt-get update && sudo apt-get install aws-sam-cli`. For Red Hat/CentOS/Fedora systems, you might use `sudo yum install aws-sam-cli` or `sudo dnf install aws-sam-cli`. The specific command depends on your Linux distribution and the availability of SAM CLI in its package repository.
- Verification: After installation, verify the installation by opening a terminal and running `sam –version`.
Configuring AWS Credentials
The SAM CLI needs to be configured with your AWS credentials to interact with your AWS account. This is typically done using the AWS CLI.
- Install the AWS CLI: If you haven’t already, install the AWS CLI. Installation instructions are available on the AWS documentation website and depend on your operating system.
- Configure AWS Credentials: Run `aws configure` in your terminal. You will be prompted for your AWS Access Key ID, Secret Access Key, default region name, and default output format.
- Access Key ID and Secret Access Key: These can be obtained from the IAM user you created in the AWS Management Console. It is essential to securely manage these credentials and avoid hardcoding them in your code.
- Default Region Name: This is the AWS region where you want to deploy your serverless application (e.g., `us-east-1`, `eu-west-1`).
- Default Output Format: This determines the format of the output from the AWS CLI (e.g., `json`, `text`, `table`).
- Credential Profiles: The `aws configure` command stores your credentials in a file named `~/.aws/credentials`. You can create multiple profiles for different AWS accounts or users. You can specify a profile using the `–profile` option with the SAM CLI commands (e.g., `sam deploy –profile my-profile`).
- Environment Variables: Alternatively, you can set the environment variables `AWS_ACCESS_KEY_ID`, `AWS_SECRET_ACCESS_KEY`, and `AWS_REGION`. This is a good practice for automation and continuous integration/continuous deployment (CI/CD) pipelines.
- Verification: Verify your configuration by running `aws sts get-caller-identity`. This command should return information about your IAM user or role. If it returns an error, there is a problem with your credentials configuration.
Project Initialization and Structure

Initializing a serverless project with the AWS SAM CLI is the foundational step in building and deploying serverless applications. This process establishes the project’s organizational framework, incorporating essential components for development, testing, and deployment. Understanding the initialization procedure and project structure is crucial for efficient serverless development and maintainability.
Initiating a New Serverless Project with `sam init`
The `sam init` command facilitates the creation of a new SAM project. This command automates the setup process, providing a starting point that adheres to best practices for serverless application development.The `sam init` command leverages a series of prompts to guide the user through the initialization process:
1. Project Type Selection
The user selects the type of application to create. Options include:
Hello World Example
Creates a simple “Hello World” application, useful for getting started.
AWS Services
Allows for the creation of applications that integrate with specific AWS services, such as API Gateway, Lambda functions, and S3 buckets.
Custom Template
Enables the use of a custom SAM template.
2. Runtime Selection
The user specifies the runtime environment for the Lambda functions. Available runtimes typically include Python, Node.js, Java, and .NET. The selection influences the dependencies and project structure.
3. Dependency Manager
The user chooses a dependency manager, such as npm for Node.js or pip for Python. This is essential for managing the project’s external libraries and dependencies.
4. Project Name
The user provides a name for the project. This name is used for the project directory and other project-related resources.After answering the prompts, `sam init` generates a project directory with the necessary files and configuration. The generated files include the `template.yaml` file, which defines the application’s infrastructure as code (IaC), and the source code files for the Lambda functions.
Template Options in `sam init`
`sam init` offers several template options to streamline the project creation process. These templates provide pre-configured code and infrastructure components, reducing the need to start from scratch. The choice of template depends on the application’s requirements and desired functionality.Available template options usually encompass the following:* “Hello World” Templates: These templates provide a basic “Hello World” function in the selected runtime.
They serve as excellent starting points for learning the fundamentals of SAM and serverless application development. These typically include a simple API Gateway endpoint that triggers a Lambda function, returning a predefined message.
Event-Driven Templates
These templates are designed for event-driven applications, such as those triggered by events from S3 buckets, DynamoDB tables, or other AWS services. They preconfigure the necessary resources and event sources, such as Lambda function configurations and IAM permissions.
API Templates
These templates create applications that expose APIs. They integrate API Gateway with Lambda functions, allowing developers to quickly build RESTful APIs. The templates may include features such as request/response mapping, authentication, and authorization.
Custom Templates
This option allows users to use custom templates. This is useful for projects with specific requirements or when a standardized template is not suitable.These templates are built to accommodate the common patterns used when building serverless applications, reducing the time to deployment. The specific templates offered will depend on the version of the SAM CLI and the available runtimes.
Standard Directory Structure of a SAM Project
A standard SAM project has a well-defined directory structure, facilitating organization and maintainability. The core component of this structure is the `template.yaml` file, which defines the application’s resources.The typical directory structure includes:* Project Root Directory: The top-level directory containing all project files.
`template.yaml`
This is the central file, containing the application’s infrastructure definition using the AWS CloudFormation template format. It specifies the resources, such as Lambda functions, API Gateway endpoints, S3 buckets, and IAM roles, along with their configurations.
`src/`
This directory houses the source code for the Lambda functions. The structure of this directory can vary depending on the project’s organization.
`app.py` (or `app.js`, `main.java`, etc.)
The source code file for a Lambda function.
`requirements.txt` (or `package.json`, `pom.xml`, etc.)
A file specifying the dependencies for the Lambda functions.
`.aws-sam/`
A hidden directory used by the SAM CLI for local testing and deployment.
`events/`
A directory to store sample event payloads for testing Lambda functions locally.
`tests/`
A directory containing unit tests for the Lambda functions.
`README.md`
A file containing information about the project.The `template.yaml` file is the core of the SAM project. This file defines the infrastructure as code, which provides a standardized way to define and deploy resources in AWS.The `template.yaml` file utilizes the YAML format. The key sections include:* `AWSTemplateFormatVersion`: Specifies the CloudFormation template version.
`Transform`
Defines the SAM transform, which simplifies the creation of serverless applications.
`Resources`
Defines the AWS resources used by the application, such as Lambda functions, API Gateway endpoints, and S3 buckets.
`Outputs`
Defines the outputs of the CloudFormation stack, such as API Gateway URLs and function ARNs.The `Resources` section is crucial for defining the serverless infrastructure. For example, a Lambda function definition within the `Resources` section typically includes:* `Type`: The type of the resource, such as `AWS::Serverless::Function`.
`Properties`
The properties of the resource, such as the function’s code location, handler, runtime, memory size, and timeout.
`Events`
Defines the event sources that trigger the function, such as API Gateway endpoints, S3 bucket events, or DynamoDB table events.The project structure, centered around `template.yaml`, provides a structured approach to managing serverless applications. It facilitates version control, automation, and collaboration among developers.
Defining Infrastructure with `template.yaml`

The `template.yaml` file serves as the blueprint for your serverless application, defining all the resources needed for deployment. This declarative approach allows you to codify your infrastructure, making it version-controllable, repeatable, and easily manageable. Instead of manually creating resources through the AWS Management Console or CLI, `template.yaml` enables you to define them as code, promoting Infrastructure as Code (IaC) principles.
This leads to increased automation, reduced human error, and improved consistency across deployments.
Role of `template.yaml` in Defining Serverless Resources
The `template.yaml` file, written in YAML, is the core of AWS Serverless Application Model (SAM). It describes the application’s architecture, including AWS Lambda functions, API Gateway endpoints, Amazon DynamoDB tables, and other AWS resources. SAM translates this template into CloudFormation stacks during deployment. CloudFormation then provisions and manages the resources defined in the template. This process ensures that the infrastructure is created and configured consistently every time the application is deployed.
The use of `template.yaml` allows for efficient management of complex serverless applications, promoting reusability and simplifying updates.
Defining AWS Lambda Functions, API Gateway Endpoints, and Other Resources
Defining resources in `template.yaml` involves specifying their properties and relationships. Each resource is defined using a unique logical ID, which is used to reference the resource within the template. This structure allows SAM to understand the dependencies between resources and orchestrate their creation in the correct order.
- AWS Lambda Functions: Lambda functions are defined using the `AWS::Serverless::Function` resource type. This resource type is a SAM-specific extension of the CloudFormation `AWS::Lambda::Function` resource, simplifying the configuration process. Key properties include:
- `Handler`: Specifies the entry point of the function (e.g., `index.handler`).
- `Runtime`: Defines the programming language runtime (e.g., `nodejs18.x`, `python3.11`).
- `CodeUri`: Points to the directory containing the function’s code. SAM automatically packages the code during deployment.
- `MemorySize`: Specifies the amount of memory allocated to the function (in MB).
- `Timeout`: Sets the function’s execution timeout (in seconds).
- `Events`: Defines the event sources that trigger the function (e.g., API Gateway, S3, DynamoDB).
- API Gateway Endpoints: API Gateway endpoints are defined using the `AWS::Serverless::Api` and `AWS::Serverless::Function` resources. The `AWS::Serverless::Api` resource represents the API Gateway itself, and its properties configure aspects such as the API name and stage. The `Events` property within a Lambda function definition connects the function to an API Gateway endpoint. This configuration specifies the HTTP method (e.g., `GET`, `POST`) and the path for the endpoint.
- Defining an API endpoint involves specifying the HTTP method and path, and associating it with a Lambda function.
- The `Events` section of the Lambda function definition is used to specify the API Gateway configuration.
- Other Resources: Other AWS resources, such as DynamoDB tables, S3 buckets, and IAM roles, can also be defined within the `template.yaml` file using their corresponding CloudFormation resource types (e.g., `AWS::DynamoDB::Table`, `AWS::S3::Bucket`, `AWS::IAM::Role`). Defining these resources allows for the complete provisioning of all necessary infrastructure.
- DynamoDB tables are defined using the `AWS::DynamoDB::Table` resource, specifying attributes, primary keys, and provisioned throughput.
- S3 buckets are defined using the `AWS::S3::Bucket` resource, allowing for the configuration of bucket names, access control, and other properties.
- IAM roles are defined using the `AWS::IAM::Role` resource, specifying the permissions that resources will have.
Examples of Common Resource Configurations using YAML Format
The following examples demonstrate how to define common serverless resources in `template.yaml`:
- Lambda Function: This example defines a simple Node.js Lambda function that logs a message.
“`yaml
Resources:
MyFunction:
Type: AWS::Serverless::Function
Properties:
Handler: index.handler
Runtime: nodejs18.x
CodeUri: ./src
MemorySize: 128
Timeout: 10
“`In this example:
- `MyFunction` is the logical ID of the function.
- `Handler` specifies the function’s entry point.
- `Runtime` indicates the Node.js runtime.
- `CodeUri` points to the source code directory.
- API Gateway Endpoint: This example defines an API Gateway endpoint that triggers the Lambda function.
“`yaml Resources: MyFunction: Type: AWS::Serverless::Function Properties: Handler: index.handler Runtime: nodejs18.x CodeUri: ./src MemorySize: 128 Timeout: 10 Events: ApiEvent: Type: Api Properties: Path: /hello Method: get “`
In this example:- The `Events` section defines an API event named `ApiEvent`.
- `Type: Api` indicates that this event is triggered by an API Gateway request.
- `Path: /hello` defines the API endpoint path.
- `Method: get` specifies the HTTP method.
- DynamoDB Table: This example defines a DynamoDB table with a primary key.
“`yaml Resources: MyTable: Type: AWS::DynamoDB::Table Properties: TableName: MyTable AttributeDefinitions:AttributeName
id AttributeType: S KeySchema:
AttributeName
id KeyType: HASH ProvisionedThroughput: ReadCapacityUnits: 5 WriteCapacityUnits: 5 “`
In this example:- `MyTable` is the logical ID of the DynamoDB table.
- `AttributeDefinitions` defines the table’s attributes.
- `KeySchema` defines the primary key.
- `ProvisionedThroughput` specifies the read and write capacity.
Function Code Development and Packaging
Developing and packaging function code is a crucial step in deploying serverless applications with SAM CLI. This process involves writing the code for your Lambda functions, managing dependencies, and preparing the code for deployment to AWS. Effective code development and packaging ensures that your functions are functional, maintainable, and deployable.
Writing Lambda Function Code
Lambda functions are the core of serverless applications, responsible for executing the business logic. The choice of programming language depends on the project’s requirements and the developer’s expertise. Common languages include Python, Node.js, Java, and Go.For instance, a simple Python Lambda function might look like this:“`pythondef lambda_handler(event, context): message = “Hello, world!” return ‘statusCode’: 200, ‘body’: message “`This function, when invoked, returns a “Hello, world!” message.
The `lambda_handler` function is the entry point for the Lambda function. The `event` parameter contains the input data provided when the function is invoked, and the `context` parameter provides information about the invocation, function, and execution environment. Node.js equivalent:“`javascriptexports.handler = async (event) => const message = “Hello, world!”; const response = statusCode: 200, body: JSON.stringify(message), ; return response;;“`The `exports.handler` function serves as the entry point in Node.js.
It takes an `event` object and, in this case, returns a JSON response containing the message. The structure of the `event` object depends on the event source that triggers the Lambda function (e.g., API Gateway, S3). The `context` object in Node.js also provides invocation details.
Handling Dependencies with Package Managers
Serverless functions often rely on external libraries and packages. Managing these dependencies efficiently is critical for maintainability and deployment. Package managers streamline this process.Package managers vary depending on the programming language:
- Python: `pip` is the standard package installer. Dependencies are typically listed in a `requirements.txt` file. For example: `requests==2.28.1`.
- Node.js: `npm` (Node Package Manager) is the default package manager. Dependencies are defined in a `package.json` file. For example:
“`json“name”: “my-lambda-function”,
“version”: “1.0.0”,
“dependencies”:
“axios”: “^1.6.7”“`
- Java: Maven or Gradle are commonly used. Dependencies are declared in `pom.xml` (Maven) or `build.gradle` (Gradle) files.
- Go: Go uses modules for dependency management. Dependencies are tracked in a `go.mod` file.
The `sam build` command automatically installs dependencies specified in the `requirements.txt` (Python) or `package.json` (Node.js) files during the build process. This prepares the code for deployment by including all necessary libraries in the deployment package.
Testing the Function Locally
Testing Lambda functions locally is essential for verifying their functionality before deployment. This allows developers to identify and fix errors early in the development cycle. The SAM CLI provides tools to simulate the Lambda execution environment.The `sam local invoke` command allows you to invoke a Lambda function locally, providing the same input data and environment variables as it would receive in AWS.
For instance, to test the Python “Hello, world!” function, you could create a `event.json` file with the following content:“`json“`Then, run the command:“`bashsam local invoke MyFunction –event event.json“`Where `MyFunction` is the logical ID of the function defined in your `template.yaml` file. The `event.json` file provides the input event data to the function. The output of the function (e.g., the “Hello, world!” message) will be displayed in the terminal, along with any logs generated by the function.The `sam local start-api` command can be used to test API Gateway integrations locally.
This command simulates an API Gateway endpoint, allowing you to test the interaction between your API and your Lambda functions. This is particularly useful for testing REST APIs. For example, if your `template.yaml` defines an API Gateway endpoint that triggers the “Hello, world!” function, you can use `sam local start-api` and then send HTTP requests to the local API endpoint to test it.
The SAM CLI will simulate the API Gateway and invoke the Lambda function. The output of the function will be displayed, mirroring how it would behave in a real AWS environment.
Local Testing and Debugging
Effective local testing and debugging are crucial for the rapid development and validation of serverless applications. They enable developers to identify and resolve issues early in the development lifecycle, reducing deployment cycles and improving overall application quality. SAM CLI provides powerful features to facilitate this process, allowing developers to simulate the AWS Lambda environment locally.
Testing Lambda Functions Locally with `sam local invoke`
The `sam local invoke` command allows for the execution of Lambda functions locally, mimicking the environment they would run in within AWS. This capability streamlines the testing process by eliminating the need for repeated deployments to the cloud.To invoke a function locally:
- Navigate to the project directory containing the `template.yaml` file.
- Use the following command structure:
sam local invoke [FunctionName] -e event.json, where:[FunctionName]is the name of the Lambda function defined in the `template.yaml` file.-e event.jsonspecifies the path to a JSON file containing the event payload. The event payload simulates the input the function receives when invoked.
For instance, consider a function named `MyFunction` and an event payload in a file called `event.json`:“`bashsam local invoke MyFunction -e event.json“`The command executes the `MyFunction` locally, using the event data from `event.json`. The output will display the function’s logs and the returned result, providing insights into the function’s behavior. The event payload, `event.json`, is a crucial aspect of local testing.
It simulates the data that the Lambda function receives from various sources, such as API Gateway, S3, or other AWS services. The structure and content of this file must align with the expected input of the function. A well-crafted `event.json` file allows for testing different scenarios, including edge cases, input validation, and error handling. For example, to test a function triggered by an API Gateway event, the `event.json` would contain the request body, headers, and other relevant information.
Simulating API Gateway Events for Local Testing
To test Lambda functions triggered by API Gateway, it is essential to simulate the API Gateway event structure locally. This allows for testing of HTTP requests, request parameters, and request bodies without deploying the application to AWS.The process involves providing an event payload that mimics the structure of an API Gateway request. This typically includes:
httpMethod: The HTTP method (e.g., `GET`, `POST`, `PUT`, `DELETE`).path: The API endpoint path.headers: HTTP headers.queryStringParameters: Query parameters.body: The request body (if applicable).
For example, an `event.json` file for a `POST` request to `/items` with a JSON body might look like this:“`json “httpMethod”: “POST”, “path”: “/items”, “headers”: “Content-Type”: “application/json” , “body”: “\”name\”: \”exampleItem\”, \”value\”: 10″“`When invoking the Lambda function with `sam local invoke -e event.json`, the function will receive this simulated API Gateway event.
The function can then process the request as if it originated from a live API Gateway endpoint. This approach allows developers to validate the function’s handling of different HTTP methods, parameters, and request bodies. Furthermore, it facilitates testing of authentication, authorization, and other API Gateway features within a local environment.
Debugging Lambda Functions Using Local Debugging Tools
Debugging Lambda functions locally is made possible by integrating with debuggers like those found in IDEs such as VS Code or IntelliJ IDEA. This integration allows developers to step through the code, inspect variables, and identify the root causes of issues.The process typically involves the following steps:
- Configure the IDE’s debugger to connect to the Lambda function’s runtime. This often involves specifying the function’s name and the port for the debugger.
- Run the `sam local invoke` command with the `–debug` flag. This flag enables the debugger and specifies the port for the debug connection. For example:
sam local invoke MyFunction -e event.json --debug 5858. The `–debug` flag with a port number (e.g., 5858) instructs SAM CLI to start the Lambda function’s runtime in debug mode and listen for debugger connections on that port. - Set breakpoints in the function’s code within the IDE.
- Trigger the function’s execution by running `sam local invoke` or through other means. When the function execution reaches a breakpoint, the debugger will pause, allowing for code inspection and step-by-step execution.
The `–debug` flag activates a debugging session. This is particularly useful because it provides real-time insights into the function’s behavior, including variable values, call stacks, and execution paths. This is crucial for identifying the sources of errors and understanding how the function operates under various conditions. The ability to debug locally greatly accelerates the development process and improves the overall quality of serverless applications.
Building and Deploying with SAM CLI
This section details the process of preparing and deploying a serverless application built using the SAM CLI to the AWS cloud. This involves utilizing the `sam build` command for application preparation and the `sam deploy` command for actual deployment, along with the configuration of essential deployment parameters. The successful execution of these steps is crucial for making the serverless application accessible and functional within the AWS ecosystem.
Preparing the Application with `sam build`
The `sam build` command is a critical step in the deployment process. It transforms the source code of the serverless application, including any dependencies, into a format that can be deployed to AWS. This process ensures that all necessary components are packaged and ready for execution in the cloud environment.The `sam build` command performs the following key actions:
- Dependency Resolution: Identifies and downloads all necessary dependencies for the application’s functions. This typically involves examining the `requirements.txt` file for Python applications or the `package.json` file for Node.js applications.
- Code Packaging: Packages the application’s code, along with its dependencies, into deployment packages. This ensures that all the necessary files are bundled together for deployment.
- Transformation of Code: Processes code to make it compatible with the AWS Lambda execution environment. For example, it may include bundling dependencies or converting code to a specific format.
- Output Generation: Creates a `.aws-sam` directory containing the build artifacts, including the packaged code and the updated template.yaml file.
The basic syntax for `sam build` is:
`sam build`
This command uses the `template.yaml` file in the current directory as the input and builds the application accordingly. The `sam build` command is essential for preparing the application for deployment. It simplifies the process of managing dependencies and ensures that the code is ready for execution in the AWS Lambda environment. For instance, consider a Python application that depends on the `requests` library.
`sam build` would download this library and include it in the deployment package, ensuring the function can make HTTP requests when deployed.
Deploying the Application with `sam deploy`
The `sam deploy` command is the final step in deploying the serverless application to AWS. It takes the built application package and deploys it to the specified AWS region. This involves creating or updating the necessary AWS resources, such as Lambda functions, API Gateway endpoints, and IAM roles, based on the definitions in the `template.yaml` file.The `sam deploy` command performs these key actions:
- Resource Creation/Update: Creates or updates the AWS resources defined in the `template.yaml` file. This includes creating Lambda functions, API Gateway APIs, IAM roles, and any other necessary resources.
- Deployment Package Upload: Uploads the deployment packages containing the application code and dependencies to an S3 bucket. This bucket stores the code that will be executed by the Lambda functions.
- Configuration of Resources: Configures the deployed resources, such as setting up API Gateway endpoints to trigger Lambda functions or configuring IAM roles with the necessary permissions.
- Stack Management: Manages the deployment as an AWS CloudFormation stack. This allows for easy updates, rollbacks, and deletion of the deployed resources.
The basic syntax for `sam deploy` is:
`sam deploy –guided`
The `–guided` flag prompts the user for deployment parameters, such as the stack name, AWS region, and S3 bucket name. This interactive mode is often the easiest way to deploy an application for the first time. Alternatively, you can specify these parameters directly using command-line arguments or configuration files.
Configuring Deployment Parameters
Deployment parameters are essential for customizing the deployment process. These parameters control aspects such as the name of the CloudFormation stack, the AWS region where the application will be deployed, and the S3 bucket used to store deployment packages.Key deployment parameters include:
- Stack Name: Specifies the name of the CloudFormation stack. This name must be unique within your AWS account and region.
- Region: Specifies the AWS region where the application will be deployed (e.g., `us-east-1`, `eu-west-2`). Choosing the appropriate region is critical for latency and cost optimization.
- S3 Bucket: Specifies the S3 bucket used to store the deployment packages. If an S3 bucket is not specified, SAM CLI creates a default bucket.
- Capabilities: Allows the user to acknowledge IAM capabilities that might be required for creating certain resources (e.g., IAM roles).
These parameters can be configured in several ways:
- Using the `–guided` option: As demonstrated above, `sam deploy –guided` guides the user through a series of prompts to configure these parameters interactively.
- Using command-line arguments: Parameters can be specified directly on the command line, for example, `sam deploy –stack-name my-serverless-app –region us-east-1`.
- Using a configuration file (samconfig.toml or samconfig.yaml): Configuration files allow you to store deployment parameters, making it easier to deploy repeatedly with the same settings. For example:
“`toml
version = 0.1
[default.deploy.parameters]
stack_name = “my-serverless-app”
region = “us-east-1”
capabilities = “CAPABILITY_IAM”
“`
The flexibility in configuring deployment parameters allows for adapting to different environments, such as development, testing, and production, by changing the stack name, region, and other configurations. For example, a development environment could be deployed to a `dev-us-east-1` stack in the `us-east-1` region, while a production environment could be deployed to a `prod-us-west-2` stack in the `us-west-2` region. This approach supports proper separation of concerns and helps in managing resources effectively.
Monitoring and Logging
Effective monitoring and logging are crucial for the operational health and performance of serverless applications. These practices enable developers to proactively identify and address issues, optimize resource utilization, and gain insights into application behavior. Implementing robust monitoring and logging strategies allows for faster troubleshooting, improved application stability, and better overall user experience.
Monitoring with CloudWatch
CloudWatch provides a comprehensive suite of monitoring services for AWS resources, including serverless applications built with SAM. It collects and analyzes data, providing actionable insights into application performance and health.
- Metrics Collection: CloudWatch automatically collects metrics for various AWS services, such as Lambda functions, API Gateway, and DynamoDB tables. These metrics include invocation count, execution duration, error rates, and throughput. Users can also define custom metrics to track application-specific performance indicators.
- Dashboards: CloudWatch dashboards allow users to visualize collected metrics in real-time. These dashboards can be customized to display key performance indicators (KPIs) and provide a consolidated view of application health. Users can create widgets to display metrics, graphs, and alarms.
- Alarms: CloudWatch alarms monitor metrics and trigger notifications or automated actions when predefined thresholds are breached. For example, an alarm can be configured to trigger an SNS notification when the error rate of a Lambda function exceeds a certain percentage. Alarms can also be used to scale resources automatically.
- Event Monitoring: CloudWatch Events (now EventBridge) enables the creation of rules that react to events happening in an AWS environment. These events can be used to trigger actions, such as sending notifications or invoking Lambda functions.
Setting up Logging for Lambda Functions
Logging is essential for understanding the behavior of Lambda functions and diagnosing issues. AWS Lambda integrates with CloudWatch Logs to store function logs.
- Logging within Function Code: Developers can use standard logging libraries (e.g., `console.log` in JavaScript, `logging` module in Python) within their Lambda function code to write log messages. These messages are automatically sent to CloudWatch Logs.
- Log Levels: Implement different log levels (e.g., DEBUG, INFO, WARN, ERROR) to categorize log messages based on their severity. This helps prioritize and filter log messages during troubleshooting.
- Structured Logging: Employ structured logging formats, such as JSON, to facilitate easier parsing and analysis of log data. Structured logs allow for the inclusion of key-value pairs, making it simpler to search and filter logs based on specific attributes.
- Environment Variables: Utilize environment variables to configure logging behavior, such as log levels or the destination of logs. This allows for easy adjustments without modifying the function code.
Accessing and Analyzing Logs for Troubleshooting
CloudWatch Logs provides tools to access, search, and analyze logs for troubleshooting serverless applications.
- Log Groups and Streams: Lambda functions write logs to log groups named after the function. Each function instance generates a log stream within its log group.
- Log Insights: CloudWatch Logs Insights enables users to query log data using a SQL-like query language. This allows for advanced filtering, aggregation, and analysis of log data.
- Log Filtering: CloudWatch Logs allows filtering of logs based on s, patterns, and time ranges. This simplifies the process of identifying specific log messages related to an issue.
- Log Retention: Configure log retention policies to specify how long logs are stored in CloudWatch Logs. Consider the trade-off between storage costs and the need to retain logs for troubleshooting and auditing purposes.
- Log Aggregation and Analysis Tools: Integrate with third-party log aggregation and analysis tools (e.g., Splunk, Datadog, Sumo Logic) to gain more advanced insights and monitoring capabilities. These tools often provide features like real-time dashboards, anomaly detection, and alerting.
Advanced Deployment Strategies
Effective deployment strategies are crucial for the successful operation of serverless applications. They enable controlled releases, minimize downtime, and facilitate efficient management across various environments. Implementing these strategies ensures a more robust and reliable application lifecycle.
Blue/Green Deployments with SAM CLI
Blue/green deployments allow for zero-downtime updates by maintaining two identical environments: the “blue” environment (current production) and the “green” environment (new version). Traffic is gradually shifted from blue to green, and if issues arise, rollback is quick.To implement blue/green deployments using SAM CLI, several steps are required.
- Template Modification: The `template.yaml` file needs to be updated to define two distinct resources for the application: the blue and green deployments. This typically involves creating separate Lambda function versions, API Gateway stages, and aliases.
- Deployment Script: A deployment script, often using the AWS CLI or SAM CLI, is necessary to manage the deployment process. This script orchestrates the creation, updates, and traffic shifting between the blue and green environments.
- Traffic Shifting: AWS Lambda aliases are utilized to manage traffic routing. Initially, all traffic is routed to the blue environment. After the green environment is deployed and tested, traffic is shifted incrementally from blue to green using Lambda alias weights.
- Monitoring and Rollback: Monitoring is crucial during traffic shifting. If errors are detected, the script can quickly rollback by redirecting traffic back to the blue environment.
A typical workflow would involve the following steps:
- Deployment of Green Environment: Deploy the new application version (green) alongside the existing version (blue). This includes Lambda function versions, API Gateway stages, and associated resources.
- Testing the Green Environment: Perform thorough testing of the green environment to ensure it functions as expected. This may involve running automated tests or manually testing the application.
- Traffic Shifting: Gradually shift traffic from the blue environment to the green environment using Lambda alias weights. For instance, initially, 10% of the traffic might be directed to green, and then progressively increased to 50%, 90%, and finally, 100%.
- Monitoring and Validation: Continuously monitor the green environment for errors or performance issues during traffic shifting. Validate the performance and functionality of the application as traffic is shifted.
- Finalization: After traffic is fully shifted and the green environment is stable, the blue environment can be decommissioned.
- Rollback: If issues arise during traffic shifting, quickly roll back by shifting traffic back to the blue environment.
An example of a simplified SAM CLI deployment script snippet might include the following:“`bashsam deploy –stack-name my-app-blue –template-file template.yaml –parameter-overrides EnvironmentName=bluesam deploy –stack-name my-app-green –template-file template.yaml –parameter-overrides EnvironmentName=greenaws lambda update-alias –function-name my-function –name live –routing-config ‘ “AdditionalVersionWeights”: “green”: 0.1, “blue”: 0.9 ‘“`This example demonstrates the initial setup and traffic shifting, where `live` is an alias pointing to the current production version (blue), and the green version receives a small percentage of traffic.
Managing Different Environments
Managing different environments (development, staging, production) is essential for a structured development lifecycle. Each environment should have its own configuration, resources, and access controls.Environment management can be achieved through various techniques, including:
- Parameterization: Utilize parameters in the `template.yaml` file to define environment-specific configurations, such as database connection strings, API keys, and resource names.
- Stack Per Environment: Create separate AWS CloudFormation stacks for each environment. This provides complete isolation and allows independent management of resources.
- Configuration Files: Store environment-specific configurations in separate files and load them during deployment.
- Environment Variables: Use environment variables within Lambda functions to access environment-specific settings.
Here’s an example of using parameters in `template.yaml`:“`yamlParameters: EnvironmentName: Type: String Default: dev AllowedValues: – dev – staging – prod ApiGatewayName: Type: String Default: !Sub “$EnvironmentName-api”Resources: MyFunction: Type: AWS::Serverless::Function Properties: FunctionName: !Sub “my-app-$EnvironmentName-function” Environment: Variables: DATABASE_URL: !If – IsProduction
!Ref DatabaseURLProd
!Ref DatabaseURLDev
CodeUri: ./src MyApi: Type: AWS::Serverless::Api Properties: Name: !Ref ApiGatewayName“`In this example, the `EnvironmentName` parameter is used to differentiate resources across environments. The `FunctionName` and `ApiGatewayName` are dynamically created based on the environment name. The `Environment` section defines environment variables that are specific to the function.
Automating Deployments with CI/CD Pipelines
Automating deployments using CI/CD pipelines is crucial for rapid, reliable, and repeatable deployments. This involves integrating SAM CLI with CI/CD tools to automate the build, test, and deployment processes.Here’s a guide to automating deployments using CI/CD pipelines:
- Choose a CI/CD Tool: Select a CI/CD tool such as AWS CodePipeline, Jenkins, GitLab CI, or GitHub Actions.
- Configure Source Control: Connect the CI/CD tool to your source code repository (e.g., GitHub, GitLab, AWS CodeCommit).
- Define Build Stage: Create a build stage that performs the following actions:
- Install necessary dependencies (e.g., Node.js packages, Python libraries).
- Run unit tests and integration tests.
- Package the serverless application using `sam build`.
- Define Deployment Stage: Configure a deployment stage that deploys the packaged application to the target environment using `sam deploy`.
- Implement Environment-Specific Configurations: Use parameters or environment variables in the CI/CD pipeline to pass environment-specific configurations during deployment.
- Add Notifications: Configure notifications (e.g., email, Slack) to receive alerts about deployment status and errors.
- Automated Testing: Integrate automated testing (e.g., integration tests, end-to-end tests) into the CI/CD pipeline to validate the application after deployment.
Example workflow with AWS CodePipeline:
- Source Stage: The pipeline starts when a code change is pushed to the repository. AWS CodePipeline detects the change.
- Build Stage: AWS CodeBuild is triggered to build the application. The build process includes installing dependencies, running tests, and packaging the application using `sam build`.
- Deploy Stage: AWS CodeDeploy is triggered to deploy the packaged application to the target environment using `sam deploy`.
- Testing and Validation: Automated tests are executed after deployment to validate the application.
- Notifications: Notifications are sent based on the pipeline’s status (success, failure).
A sample configuration file for AWS CodeBuild could be:“`yamlversion: 0.2phases: install: runtime-versions: nodejs: 16 pre_build: commands:
npm install
build: commands:
sam build
post_build: commands:
sam deploy –stack-name my-app-dev –s3-bucket my-deployment-bucket –capabilities CAPABILITY_IAM –region us-east-1
“`This configuration file specifies the Node.js runtime, installs dependencies, builds the application with `sam build`, and deploys it using `sam deploy`. The `–s3-bucket` parameter is required to store the deployment artifacts.
Ultimate Conclusion
In conclusion, the SAM CLI offers a robust and efficient solution for deploying serverless applications on AWS. By leveraging its features, developers can significantly reduce development time, improve application performance, and optimize costs. From initializing projects to implementing advanced deployment strategies, this guide provides a complete roadmap for successfully navigating the serverless landscape. Embracing SAM CLI is a strategic move towards building scalable, resilient, and cost-effective applications in the cloud.
Helpful Answers
What is the difference between SAM and CloudFormation?
SAM is a framework built on top of CloudFormation. It simplifies the definition of serverless resources by providing shorthand syntax and abstractions specifically for serverless applications. While CloudFormation allows you to define any AWS resource, SAM focuses on serverless components like Lambda functions, API Gateway, and DynamoDB tables, making the configuration process more concise and developer-friendly.
Can I use SAM CLI with other programming languages besides Python and Node.js?
Yes, SAM CLI supports various programming languages. While Python and Node.js are commonly used, you can also use Java, Go, .NET, and others. The specific steps for packaging and deploying your code will vary depending on the language and build tools used.
How do I manage different versions of my serverless application?
You can manage different versions of your serverless application using features like Lambda aliases and API Gateway stages. Aliases allow you to point to different versions of your Lambda functions, enabling blue/green deployments and rollback capabilities. API Gateway stages allow you to separate different environments (e.g., development, staging, production) and deploy different versions of your API.